During several trips, I attempted to upload newly taken photos to my Immich server at home in Changsha. I used to rely on Cloudflare Tunnel for reverse proxying, but due to the particularities of the Chinese network environment, slow connections, frequent disconnections, and failed uploads became the norm. Later, I started experimenting with Tailscale — a NAT traversal tool based on WireGuard — and it finally allowed me to stably and quickly access my home NAS and photo library from anywhere in China.
However, a new problem emerged: when Tailscale runs on Android, it needs to take over the system traffic as a VPN service. Meanwhile, my usual tool Clash also relies on the VPN interface for traffic routing. Due to Android’s limitation of allowing only one VPN service at a time, the two cannot coexist. This meant I had to choose between “accessing home services” and “accessing the open internet”.
This article walks through the principles of Tailscale, how to set up your own DERP server to improve connection quality, and how to hijack traffic from a Tailscale Exit Node using iptables and forward it to ShellCrash, enabling flexible traffic routing and secure tunnelling. Whether you’re looking to access your home NAS or photo library remotely, or protect your data on untrusted networks, this guide offers a practical and stable solution.
What is Tailscale?
Tailscale is a zero-config virtual private network (VPN) tool based on the WireGuard protocol. It allows devices located in different network environments to communicate as if they were on the same secure local network. By automatically traversing NATs and firewalls, Tailscale enables access to your home NAS, personal servers, development environments, and other internal resources without requiring a public IP or port forwarding. Its key strengths lie in its simplicity, security, and stability — it’s ready to use out of the box, encrypts all traffic end-to-end, and is suitable for developers, remote workers, and home users alike.
Tailscale’s technical implementation is quite ingenious. It builds on the WireGuard encryption protocol but reimagines traditional VPN IP allocation. Each device authenticates using SSO/OAuth2 and receives a node key that is permanently bound to its identity. This identity-based networking model allows a “NAS in Changsha” and a “phone in Hong Kong” to communicate as if they were coworkers in the same office.
How Tailscale Establishes Connections
Control Server
When a Tailscale client starts, it first connects to the control server (controlplane) to authenticate and fetch information about other nodes in the network, including each device’s public IP, port, NAT type, etc. This step is essentially the “getting to know your peers” phase. The control server does not relay any traffic — it only coordinates connections, acting like a dispatcher.
DERP Servers
A key factor behind Tailscale’s high connection success rate is its custom relay protocol called DERP. In Tailscale’s architecture, DERP (Designated Encrypted Relay for Packets) is a crucial component that only steps in when needed. In simple terms, it’s an encrypted HTTP-based relay server that acts as an intermediary when two devices cannot connect directly. All clients initially connect via DERP (relay mode), meaning the connection is established instantly with no waiting. Then, both sides begin path discovery in parallel, and within a few seconds, Tailscale typically finds a better route and transparently upgrades the connection to a direct peer-to-peer tunnel.1
Important notes:
- All traffic relayed via DERP is end-to-end encrypted, so DERP servers cannot see the content;
- Tailscale uses DERP only when necessary — once a direct connection is established, it automatically switches;
- Official DERP nodes are distributed globally, and clients automatically select the one with the lowest latency;
- You can also deploy your own DERP server (for example, within China) to improve latency and reliability. Think of DERP as a fallback mechanism — although it’s not as performant as direct connections, it ensures devices can always stay connected even when NAT traversal fails.
NAT Traversal
After obtaining the peer’s address info, Tailscale attempts to establish a peer-to-peer (P2P) connection via NAT traversal. This process uses the STUN protocol, where both sides send probe packets to try to punch a hole through the NAT router and create a direct UDP tunnel. If the network conditions allow, a direct tunnel is established, offering fast speeds and low latency.
Due to space constraints, we won’t go into detail about NAT traversal here. For more information, refer to Tailscale’s official article “How NAT traversal works”.
Full Connection Flow Diagram
Hosting Your Own DERP Server
Tailscale installation is straightforward across platforms, and the official documentation covers it in detail. This article assumes you have already installed and logged into Tailscale on the relevant devices.
Why Host Your Own DERP?
Tailscale has deployed numerous DERP relay servers globally2. However, for well-known reasons, there are no official DERP nodes within mainland China. This leads to the following issues:
- When NAT traversal fails, all traffic must be routed via overseas DERP nodes, resulting in high latency and poor performance;
- Some official DERP nodes may be disrupted by the Great Firewall (GFW), causing connection drops or handshake failures;
- Even when direct connections succeed, Tailscale still relies on DERP for exchanging route info and WireGuard keys — if DERP is unreachable, connection quality suffers.
Therefore, in the Chinese network environment, hosting a local DERP node can significantly improve connection stability and performance, while also avoiding unexpected issues caused by network restrictions — making it a worthwhile optimisation.
Prerequisites
As DERP is HTTP-based, you’ll need an HTTP reverse proxy and an SSL certificate. This guide uses Docker for deployment. Before proceeding, ensure your server has Docker and Docker Compose installed. You’ll also need basic knowledge of editors like nano to modify config files. For optimal results, your server should have a static public IPv4+IPv6 dual-stack address.
If all requirements are met, you can begin deployment:
| |
docker-compose.yml
| |
The network_mode: host setting is crucial. It allows the container to share the host’s network stack. If Docker’s default bridge mode is used, the container’s network will be NATed, and the DERP STUN service will detect a 172.17.0.0/16 address instead of the client’s real public IP, causing connection issues.
| |
As mentioned earlier, DERP traffic is end-to-end encrypted, and DERP servers do not know who is using them. Without proper access control, anyone who knows your DERP address and port could use it. This volume mounts the Tailscale socket file into the container, allowing the DERP service to authenticate clients via the local tailscaled service. Combined with DERP_VERIFY_CLIENTS=true, it prevents freeloaders from using your DERP node.
Notes:
- Your host must already have the Tailscale client (
tailscaled) installed and logged in, or the socket file won’t exist and the container will fail; tailscaledmust run with root privileges to create this socket.
Reverse Proxy
Using Caddy as an example, reverse proxy port 4433 and deploy an SSL certificate:
| |
Note: If you’re using MagicDNS with Caddy and DNS providers to request a wildcard certificate, you may encounter local certificate validation errors. Setting the resolvers parameter resolves this issue.
Visit the proxied node — if you see the following page, the setup is correct:
Configuring ACL Policies
Go to the Tailscale admin console’s page and add your custom DERP configuration.
Tailscale’s ACL policies are written in HuJSON3. To edit in VSCode, set the language mode to “JSON with Comments (jsonc)”. Here’s an example configuration:
| |
Tailscale reserves RegionIDs 1–899 for official nodes. Custom DERPs must use IDs 900 and above.
Testing the Connection
Once you’ve saved your ACL configuration, Tailscale will automatically sync it to all clients. After a short wait, run tailscale netcheck on a client to test the connection:
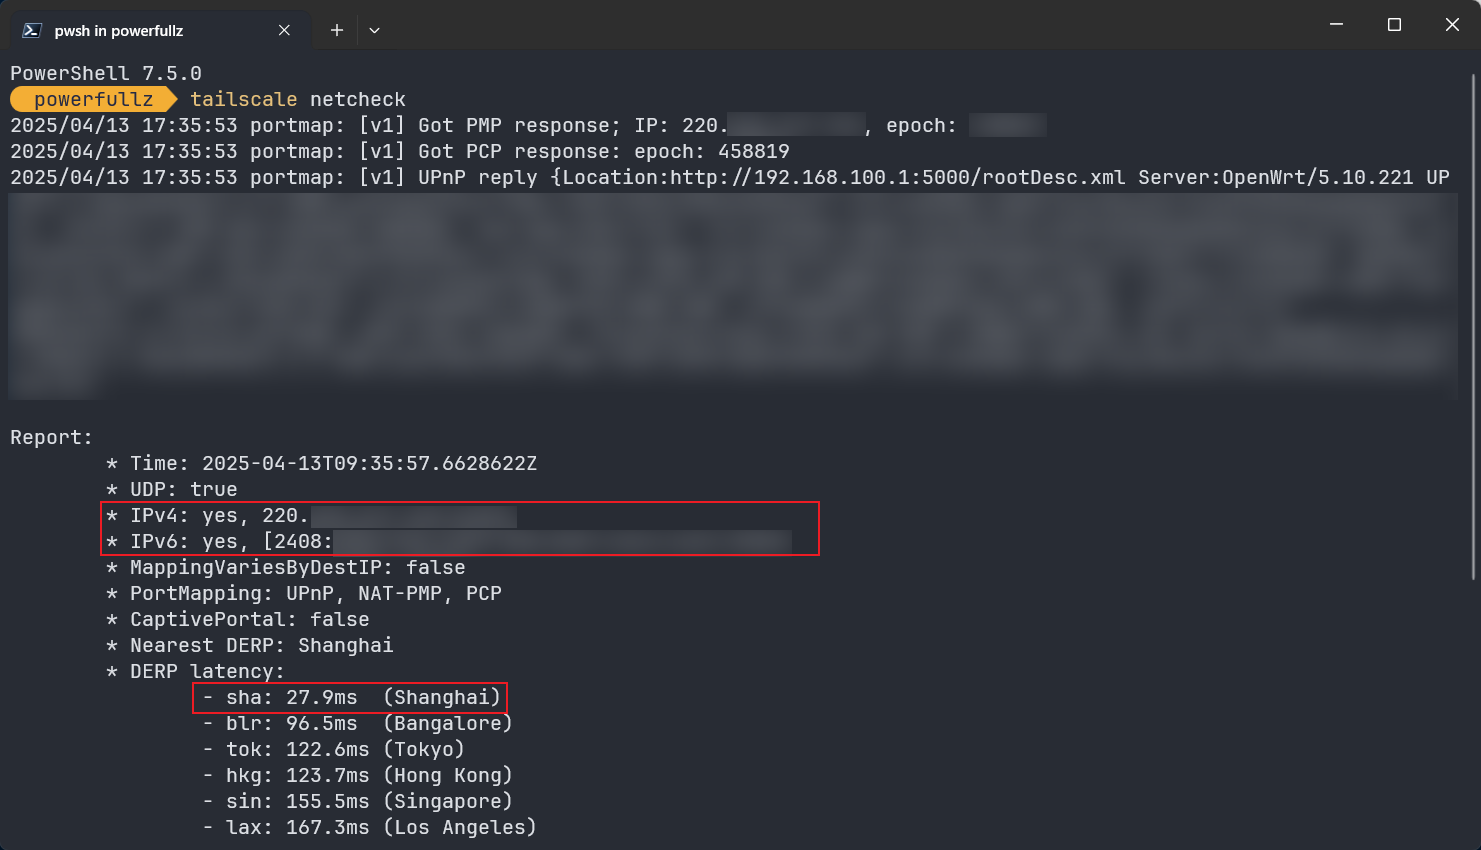
Pay attention to whether the returned IP is your actual public IP. If it shows an address in the 172.17.0.0/16 range, your Docker configuration is incorrect.
Coexisting with Internet Access: Hijacking Exit Node Traffic to the Clash Engine
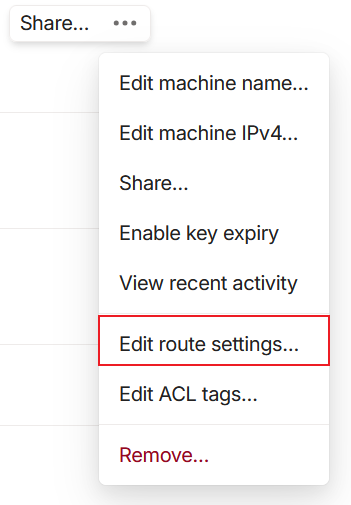
Declaring an Exit Node
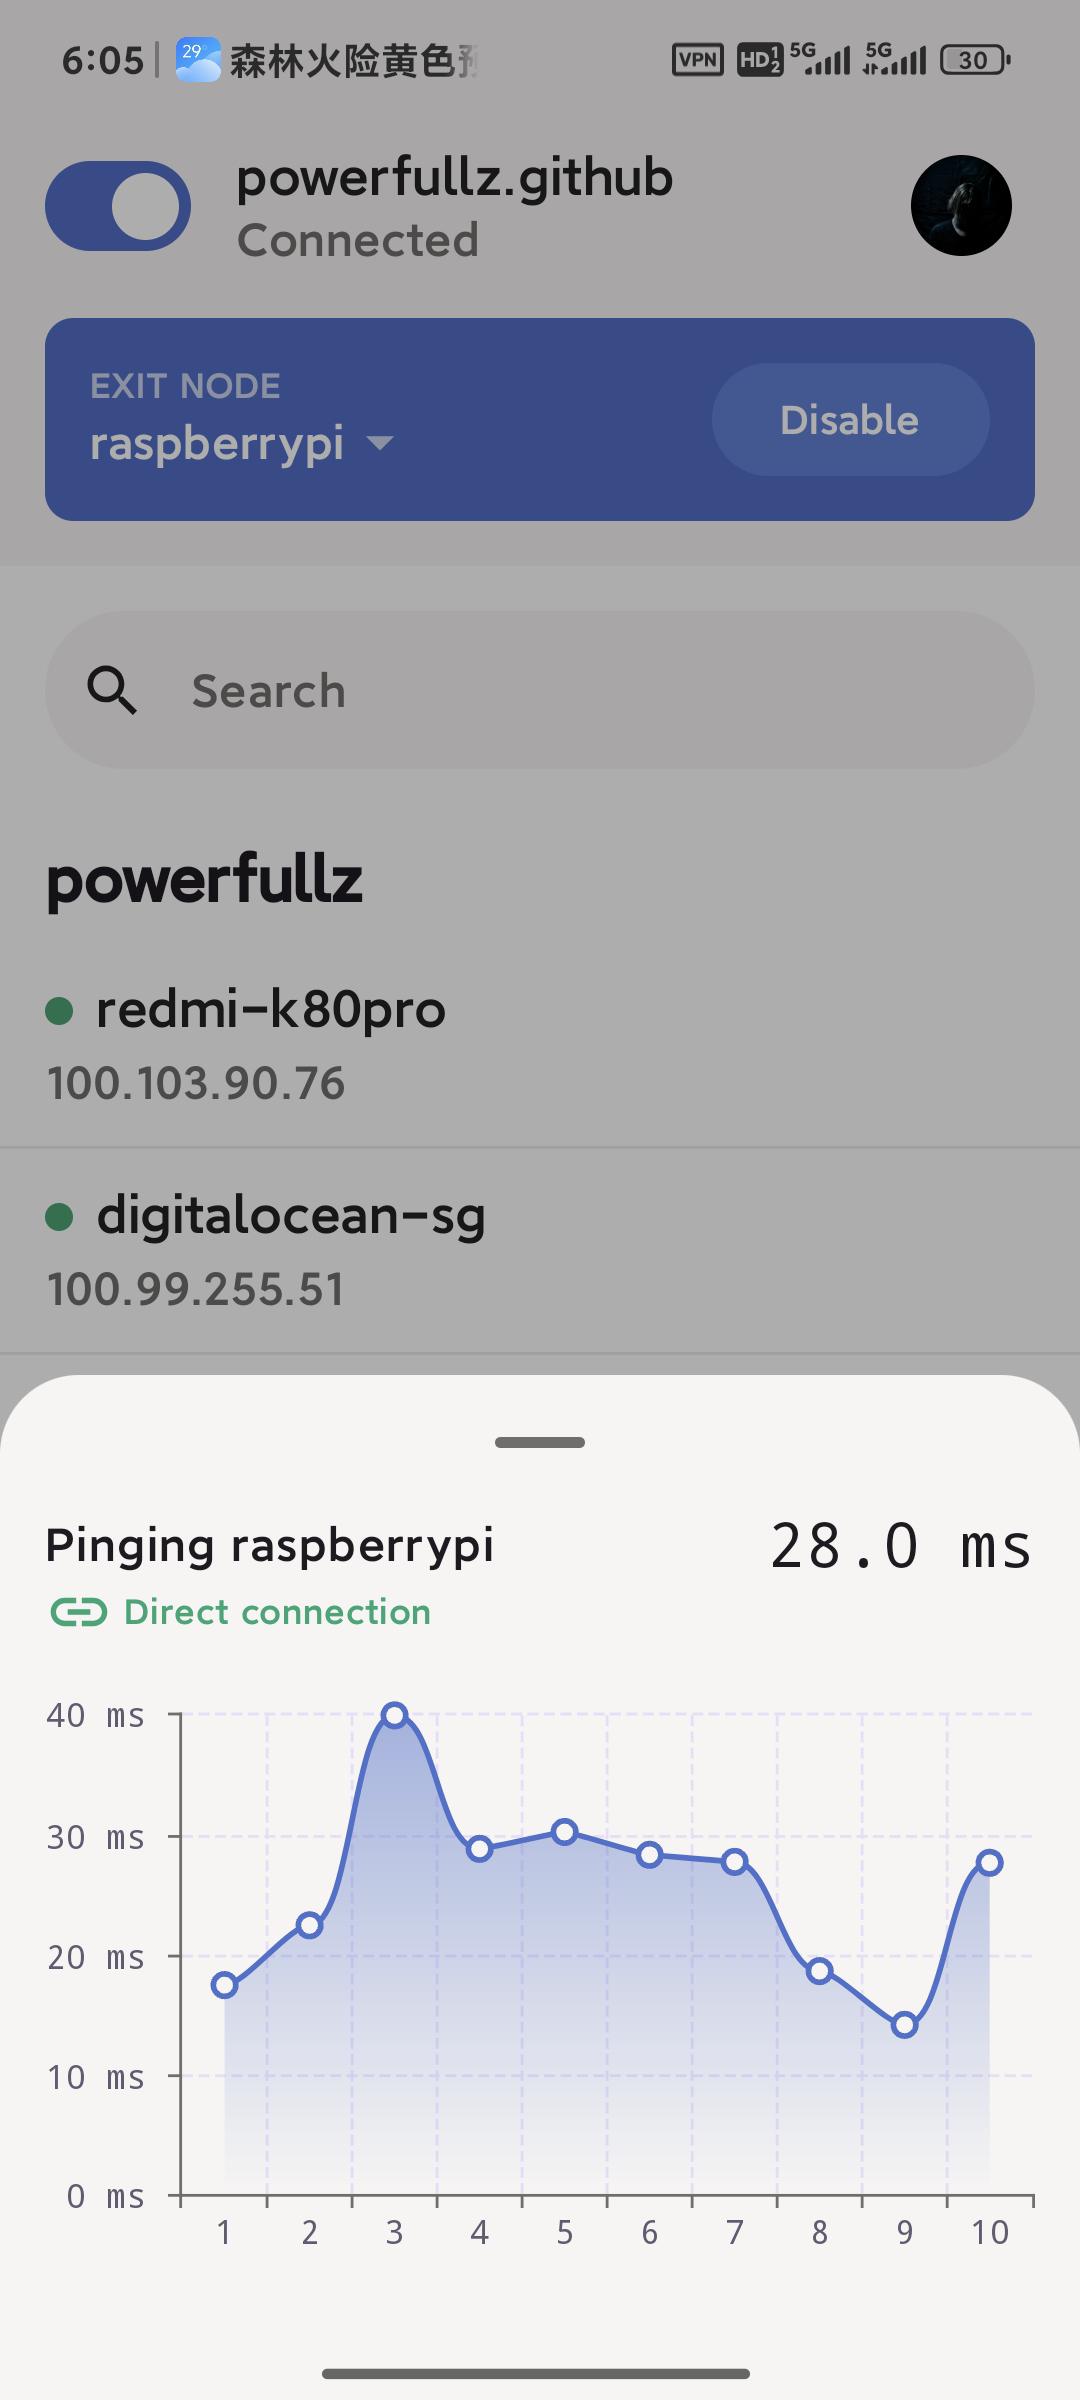
Prepare a device at home that stays on 24/7 — this could be a Raspberry Pi or a Mac Mini. Install Tailscale and declare it as an Exit Node. You can also advertise your home LAN subnet if needed. Once enabled in the Tailscale console, this device becomes a free VPN, allowing you to securely access the internet from unfamiliar networks.
| |
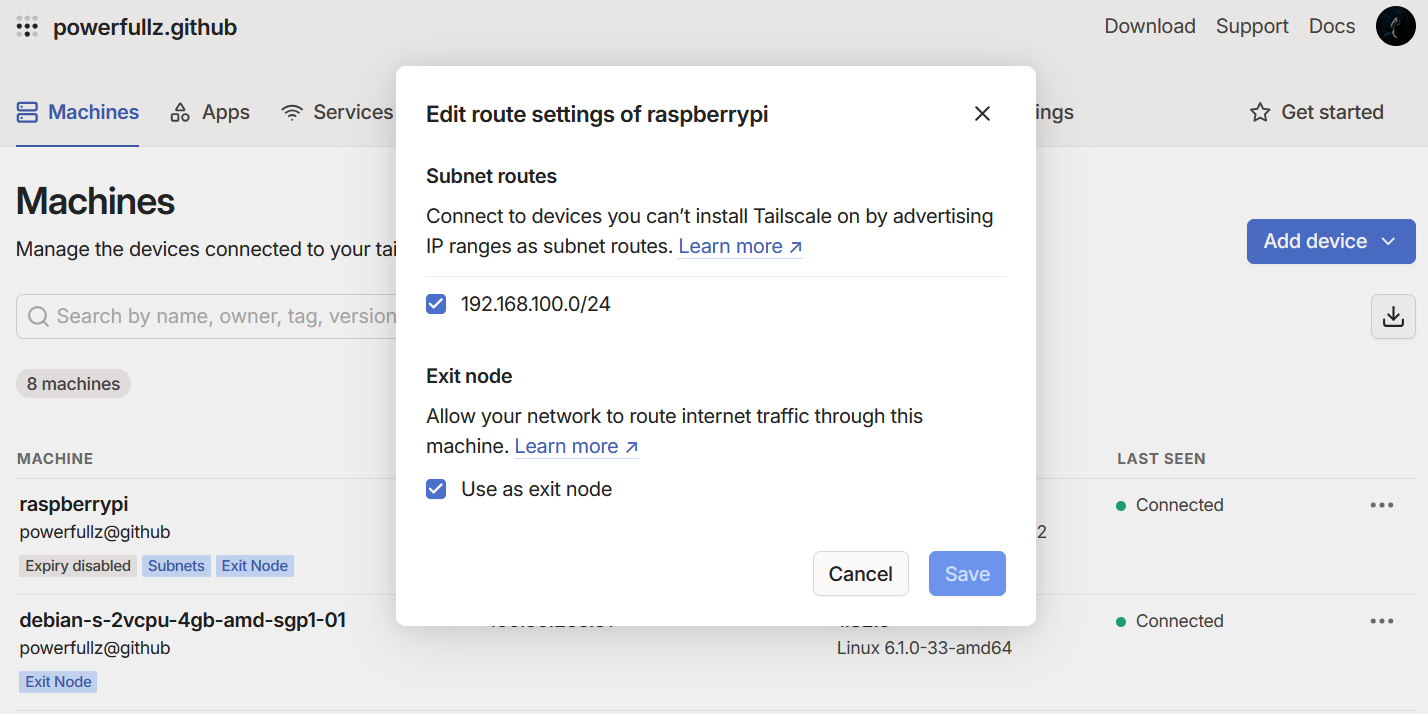
Once broadcasting is complete, you can access all devices on your home network from anywhere in the world, as long as you’re connected to the Tailscale network.
Enabling IP Forwarding and Disabling UDP GRO4
Enabling IP forwarding is essential for devices like the Raspberry Pi to function as an Exit Node. The following commands are for Raspberry Pi — if you’re using a different device, refer to the official Tailscale documentation.
| |
According to Tailscale5, disabling UDP GRO6 can improve forwarding performance. Although the official persistence method may not work on Raspberry Pi, we can configure it manually.
| |
To persist this setting, create a systemd service:
| |
Add the following content:
| |
Then enable and start the service:
| |
Hijacking Traffic on the Exit Node
My Exit Node is a Raspberry Pi. After configuring it as an Exit Node, the final step is to hijack the traffic sent from my phone to the Exit Node in order to enable open internet access. For stability reasons, I prefer not to run proxy software directly on the main home router. Therefore, hijacking traffic on the Pi is the only viable solution.
First, install ShellCrash. Follow the prompts to import configuration files and set up automation as needed:
| |
Start the service and change the firewall mode to “Clean Mode”. I also recommend enabling SNI sniffing and switching the DNS mode from fake-ip to redir-host7, and enabling IPv6 transparent proxy.
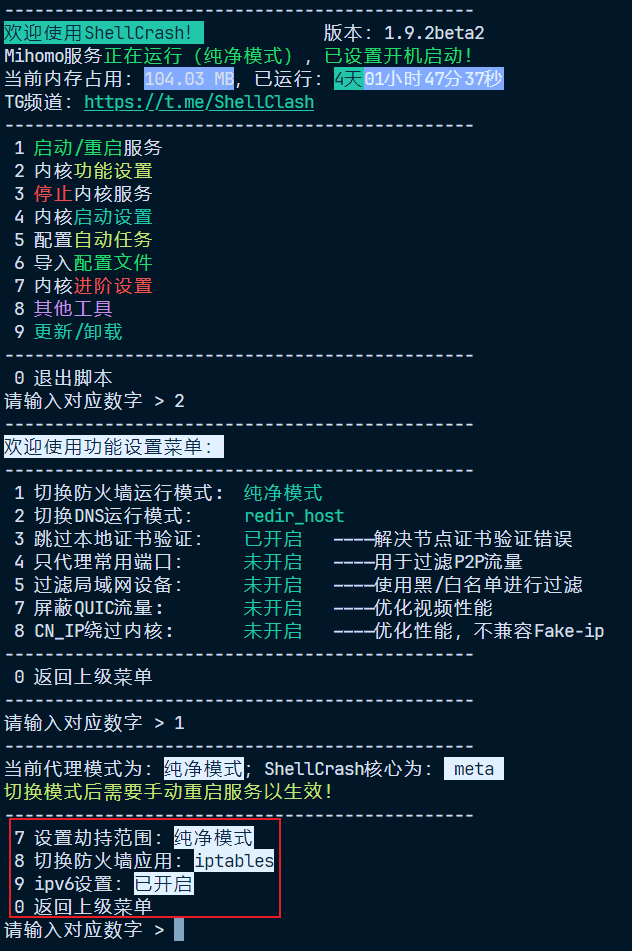

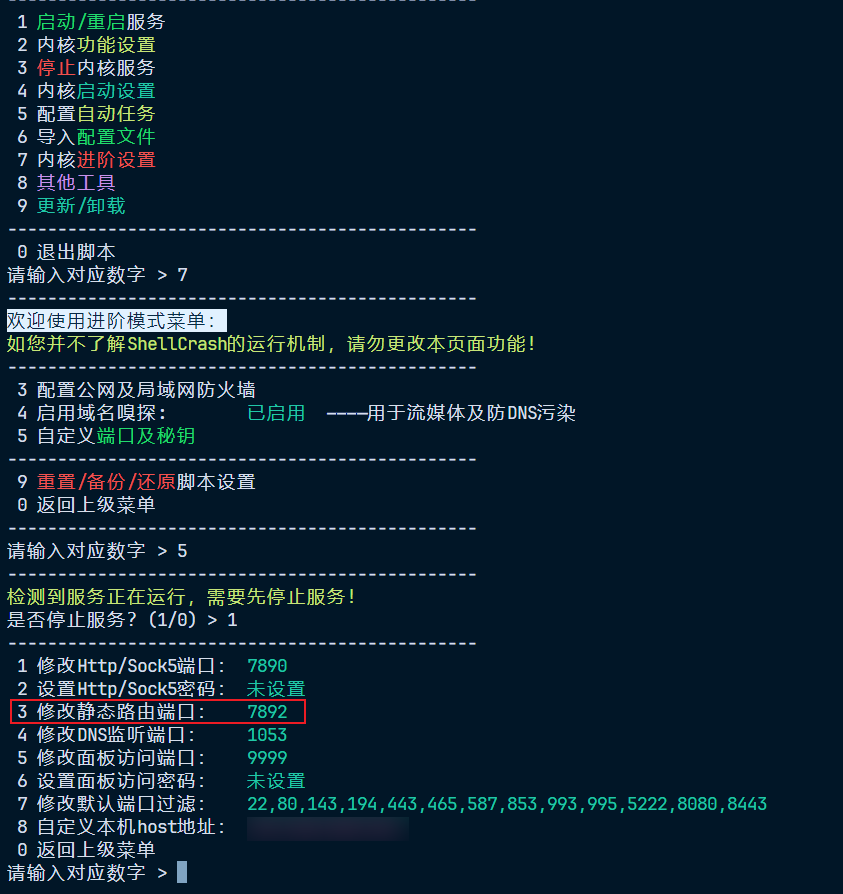
Setting Clean Mode allows us to manually configure iptables for more precise traffic hijacking. Use ifconfig to check the Tailscale interface name — it’s usually tailscale0 by default:
| |
Hijack all traffic from tailscale0 to the local Clash engine’s listening port 7892. This is called the “static route port” in ShellCrash. Don’t forget to also hijack IPv6 traffic:
| |
Advanced: Hijacking UDP Traffic with TProxy
The iptables REDIRECT target can only redirect TCP traffic. Since UDP is a connectionless protocol, REDIRECT cannot retain the original destination address, which prevents transparent proxies from identifying the original destination.
So, if you attempt to hijack UDP traffic using a rule like this:
| |
This rule will either not work or cause abnormal proxy behaviour.
Is there a way to proxy UDP traffic? Yes, indeed. But the prerequisites are:
- The proxy core must support UDP transparent proxying (Clash Premium and Mihomo both support this);
- You must use TProxy mode instead of REDIRECT;
- The
iptablesmangle table and policy routing must be correctly configured; - UDP proxying must be enabled in the proxy configuration file (e.g.
mode: ruleandudp: true).
Assuming you’ve fulfilled the first, second, and last conditions, here is an example8:
| |
And of course, don’t forget about IPv6:
| |
Persisting Routing Rules
Rules created with ip rule and ip route are lost after a reboot, so we need to persist them manually. The simplest method is to create a script and add it to crontab.
Create a script:
| |
Edit it as follows:
| |
After granting execution permissions, edit crontab:
| |
Add the following line at the end of the crontab file:
| |
How It Works: How Does TProxy Forward UDP Traffic?
If you’ve read this far, you might be wondering: why, throughout the entire process, we never specified --to-ports in iptables, nor did we see the destination address being modified, yet UDP traffic was somehow successfully proxied? How is that possible?
To explain this, let’s first look at the fundamental differences between TProxy and REDIRECT:
REDIRECT Mode:
- Uses the
iptablesnattable; - Rewrites the destination address to a local one (e.g.
127.0.0.1:7892); - Typically used for TCP traffic;
- Cannot preserve the original destination address;
- Requires specifying
--to-ports.
TPROXY Mode:
- Uses the
iptablesmangletable; - Does not modify the destination IP, preserving the original target;
- Uses
fwmarkand policy routing to route packets tolo; - The proxy listens on a special port (e.g. 7893) with
IP_TRANSPARENTenabled; - Supports both UDP and TCP;
- No need to specify
--to-portsiniptablessince this is not NAT, but marking + routing.
TProxy does not use DNAT/REDIRECT. Instead, it marks packets using the mangle table, then uses policy routing (ip rule + ip route) to route those packets to the lo interface. The proxy application (e.g. Clash / ShellCrash) listens on a port on lo9, and with the IP_TRANSPARENT option enabled, it can read the original destination IP and port from the packet and forward the traffic accordingly.
In short, TProxy mode only requires:
iptablesto mark packets;ip rule+ip routeto route them tolo;- The proxy to listen on
lowithIP_TRANSPARENTenabled.
Thus, there’s no need to specify --to-ports in iptables, because the destination IP and port remain unchanged, and the proxy can detect and handle them itself.
Persisting iptables Rules
Install iptables-persistent:
| |
During installation, you’ll be prompted to save the current IPv4 and IPv6 rules — select “Yes”. If you later add new rules, remember to save them:
| |
Saved rules are stored in:
- IPv4:
/etc/iptables/rules.v4 - IPv6:
/etc/iptables/rules.v6
You can also edit the rules.v4/rules.v6 files directly as needed.
Final Result
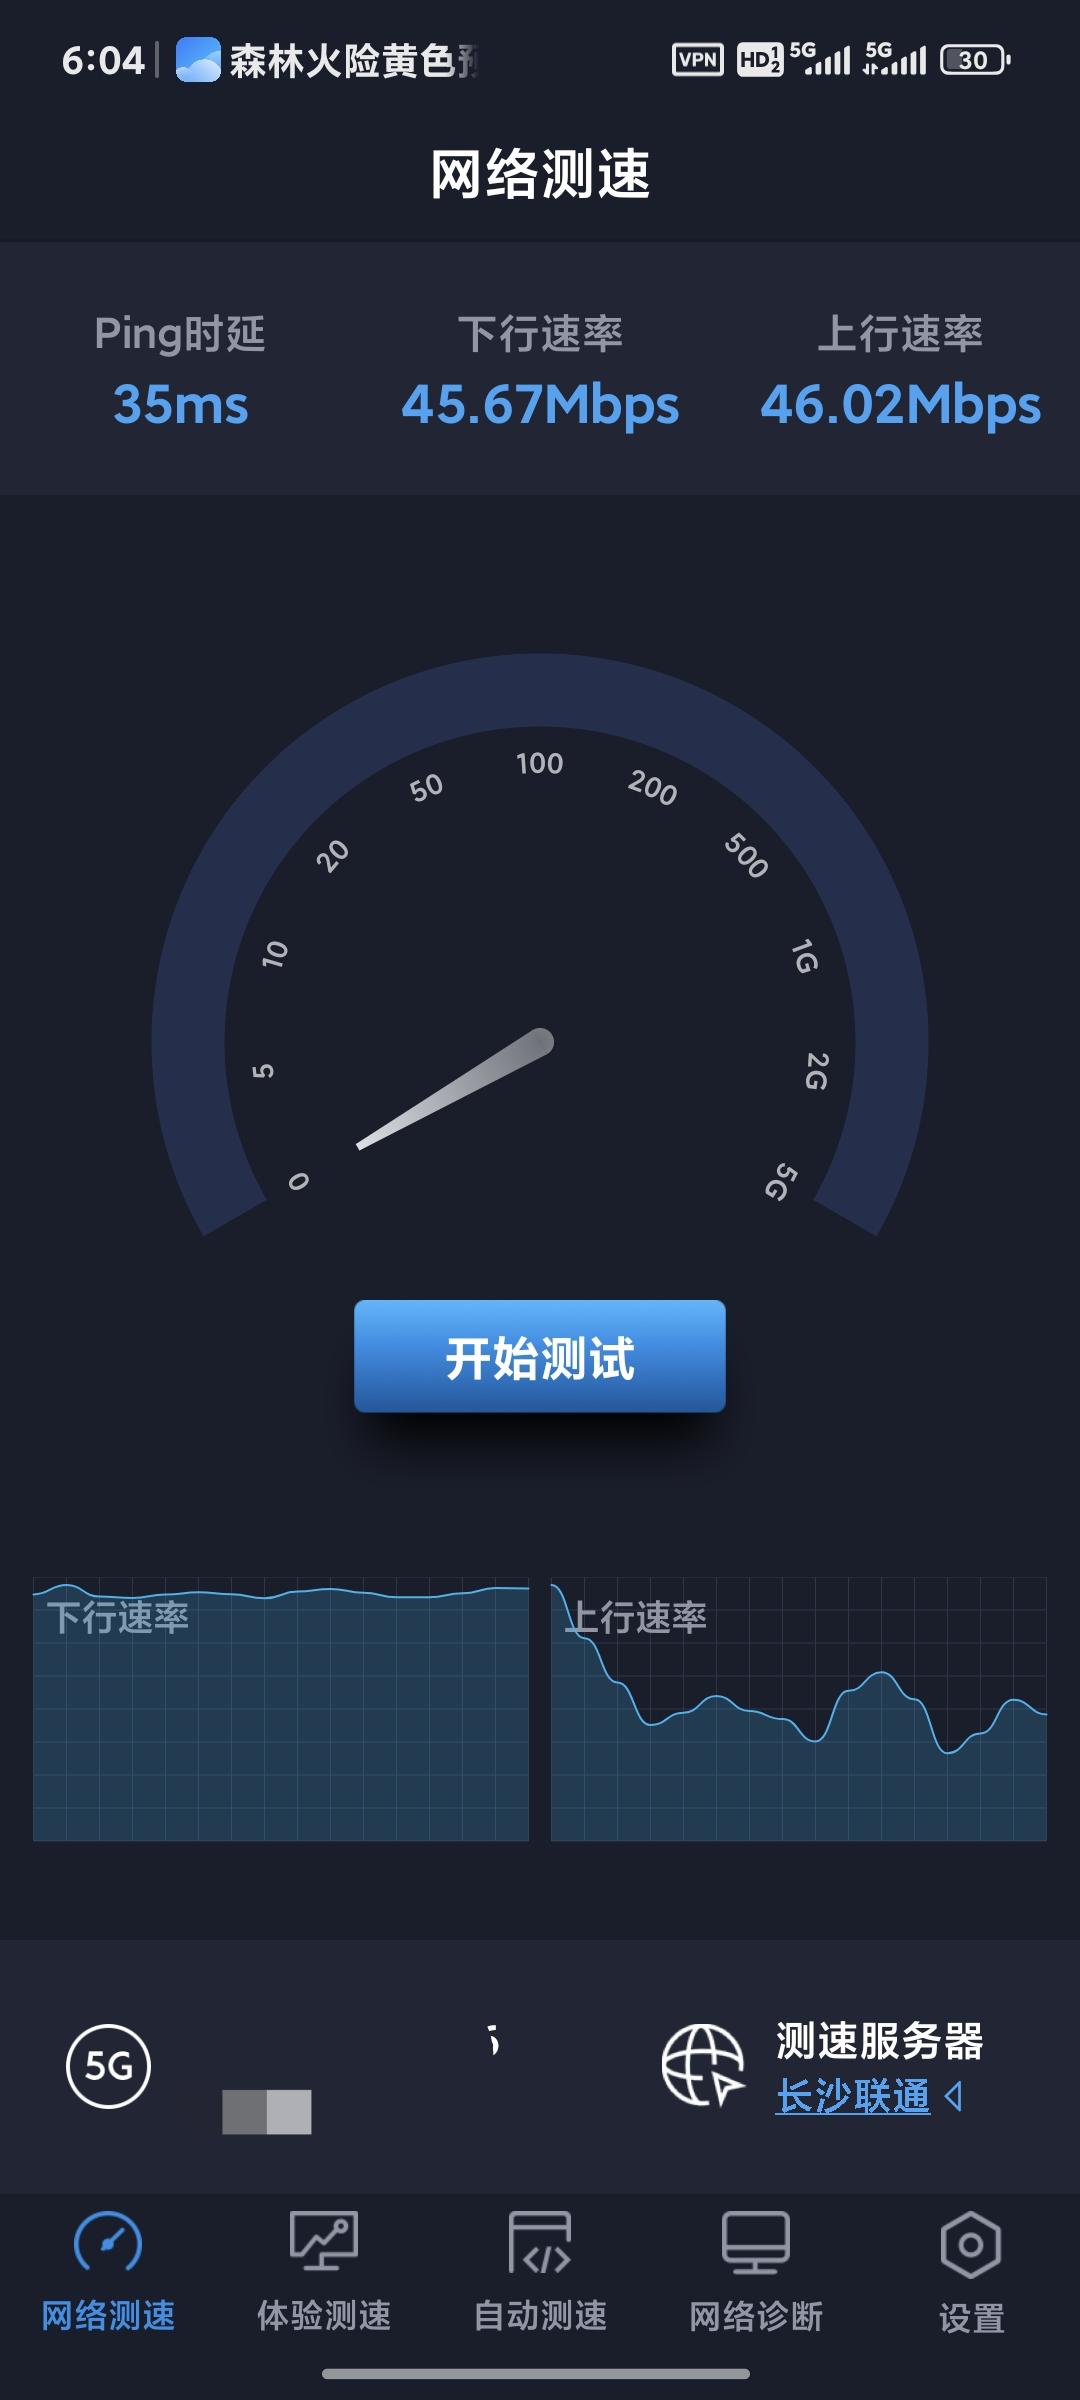
The performance of this setup largely depends on your home network’s upload bandwidth. I have a 500Mbps down / 60Mbps up connection, and I haven’t encountered a single NAT traversal failure so far. Speeds are consistently high, latency is acceptable, and I can securely access my Immich server, OpenWRT router, and other home devices from anywhere with end-to-end encryption — all while enjoying unrestricted internet access. Overall, I’m quite satisfied with the solution.
Reference: https://icloudnative.io/posts/custom-derp-servers/ ↩︎
Reference: https://tailscale.com/kb/1232/derp-servers ↩︎
About HuJSON: https://github.com/tailscale/hujson ↩︎
Reference: https://tailscale.com/kb/1408/quick-guide-exit-nodes ↩︎
Reference: https://tailscale.com/kb/1320/performance-best-practices#linux-optimizations-for-subnet-routers-and-exit-nodes ↩︎
UDP GRO (Generic Receive Offload) is a Linux kernel network optimisation that merges small packets to improve efficiency. However, when acting as a forwarding node, this can increase latency and reduce throughput under packet loss conditions. ↩︎
Compared to
fake-ip,redir-hostoffers better compatibility, fewer issues, and avoids temporary disconnects caused by fake IP residue when toggling proxy modes. My Pi uses a preconfigured SmartDNS setup with no DNS pollution, resulting in a smooth experience. ↩︎Reference: https://blog.zonowry.com/posts/clash_iptables_tproxy/ ↩︎
lois the default loopback interface in Linux systems. In transparent proxy setups, it not only handles localhost traffic but is also used to receive network connections originally destined for external addresses, enabling local hijacking and forwarding of external traffic. ↩︎
Comments are disabled until you accept functional cookies.