Terraform is an IaC tool. IaC stands for ‘Infrastructure as Code’: we write our infrastructure as declarative code, then use terraform apply to deploy it. With the same configuration, you will always get exactly the same infrastructure every time (Nix OS users rejoice).
Why use Terraform
Traditional infrastructure management mostly relies on manual work and the dashboards provided by various cloud vendors, which brings the following pain points:
| Pain point | Explanation |
|---|---|
| Hard to reproduce | Configuring things by clicking around in a dashboard makes it easy to miss or misconfigure something, and hard to reproduce later |
| Environment drift | Manual changes gradually cause production and test environments to diverge, so in extreme cases testing is fine but production falls over |
| Hard to scale | Adding a new environment requires repeating lots of manual steps, which is time-consuming and error-prone |
| Hard to audit | There is no change history, |
| Hard to collaborate | Infrastructure ends up controlled by a small number of ‘people who know’, and anyone who wants to change something has to go through them, which is inefficient |
To solve these problems, the concept of ‘Infrastructure as Code’ 1 was introduced, and Terraform is one of the best-known solutions.
Take a realistic use case: suppose you buy a new GCP account with $300 trial credit every year. It is cheap, but every year you have to go back into the GCP console and recreate your machines. With Terraform, if you want to deploy the same setup again, you just replace the API token after switching accounts, then run terraform apply. In a few minutes, you can recreate exactly the same machines, VPCs, S3, firewall rules, and so on as in your previous account.
Another example is managing and migrating Cloudflare DNS and Tunnel. You only need to copy the old Tunnel’s Ingress Rule to the new Tunnel’s Ingress Rule. Even if you later migrate to other providers such as AliDNS or Route 53, you can still copy the data across as-is 2.
This becomes especially useful when working with other people. Combined with Git, every change leaves a trace, merge conflicts are far less worrying, PRs can automatically generate previews of changes, and if something goes wrong you can roll back to the previous version immediately. None of this is really possible with the traditional approach of people directly operating a provider’s dashboard by hand.
Installing Terraform
Terraform is written in Go, and the compiled output is naturally a single executable file, so installation is very straightforward. On Windows, you can install it directly with Winget:
| |
If you do not want to use Winget, you can also use Scoop or another package manager, or place the precompiled binary into $PATH to complete the installation.
If you are on Linux, just use the appropriate package manager. If you install it by placing the binary into $PATH, remember to use sudo chmod +x terraform to make the file executable.
Two basic Terraform concepts
Provider(s)
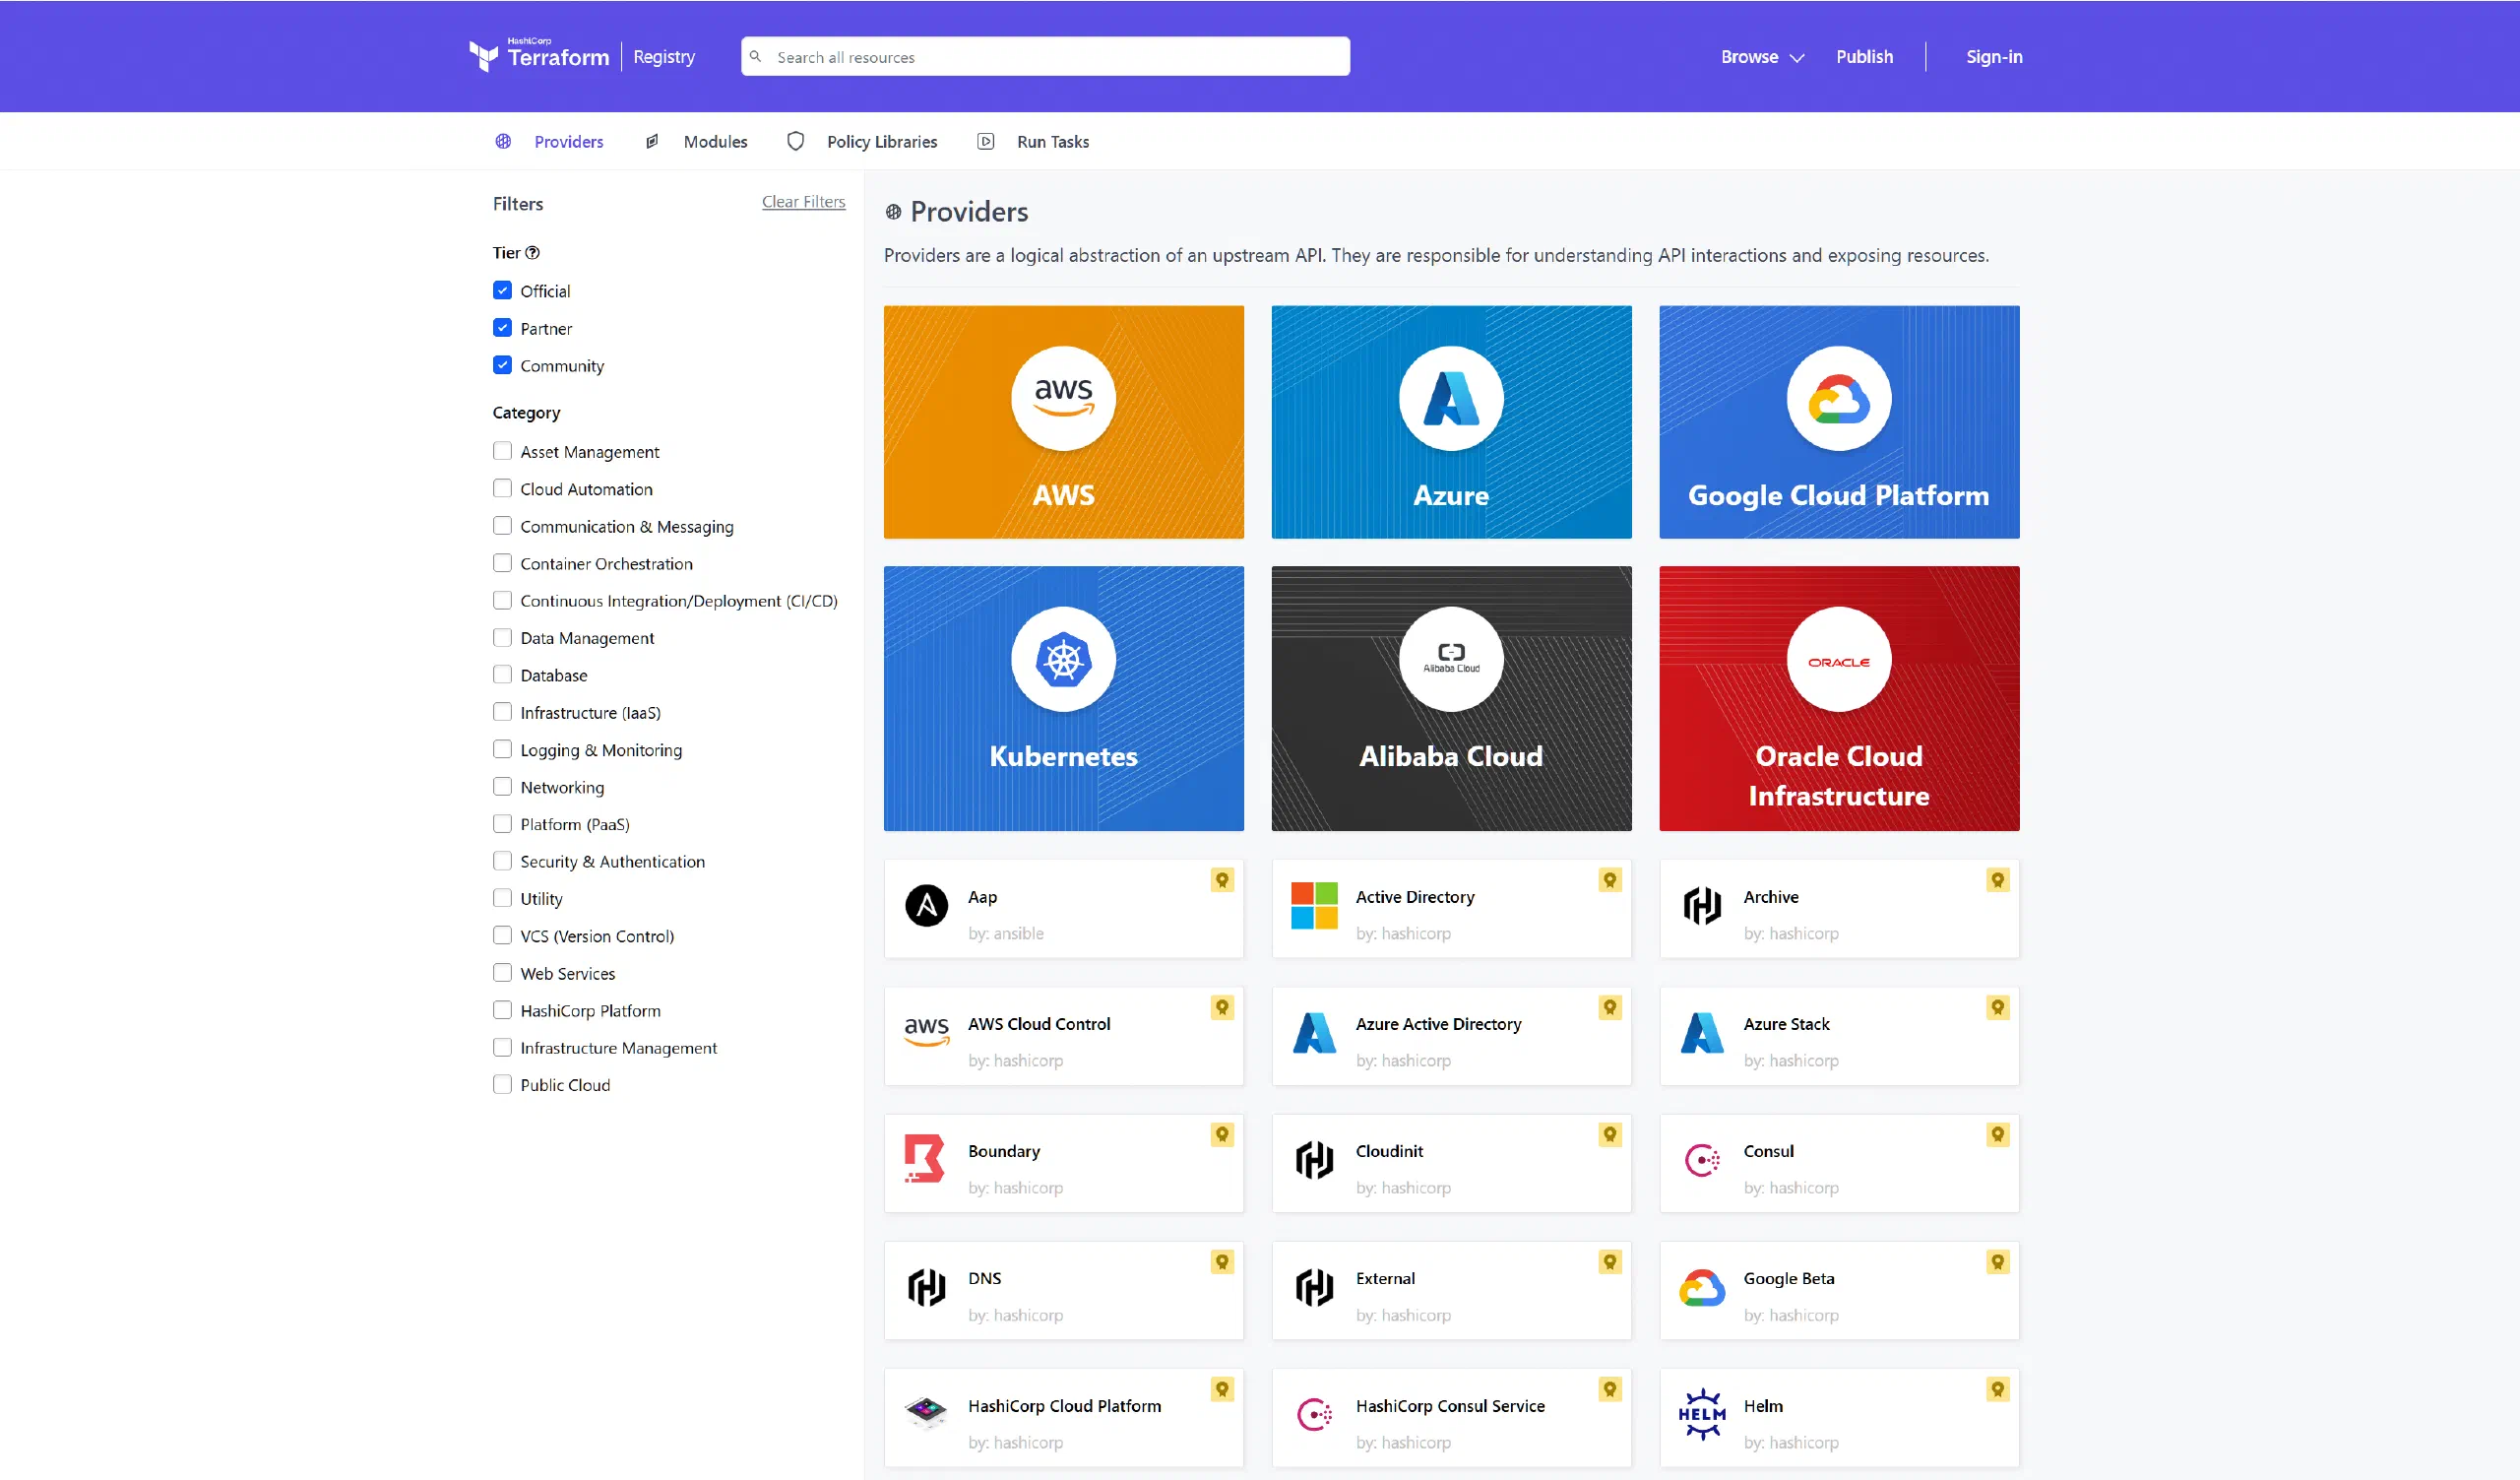
As mentioned earlier, Terraform is an Infrastructure as Code tool. As a tool, it is not tied to any specific platform. Instead, it connects to different platforms through Provider(s). To see what Provider(s) are available, you can browse Terraform’s Registry.
State management
Terraform stores the state information from each infrastructure change operation in a state file. By default, this is saved as the terraform.tfstate file in the current working directory 3, though you can also configure a different backend such as S3 or Postgres. Every time you run terraform apply, Terraform compares the state declared in the current configuration files with the existing state file, calculates the differences, works out the correct order of operations, and then tells the Provider to apply those changes.
Terraform’s resource import problem
Importing existing resources has long been one of Terraform’s most criticised pain points. Hashi Corp. seems to have stuck to a stubborn and frankly silly idea for years: all your infrastructure should have been created with Terraform from the very beginning, so there is no such thing as a resource import problem.
| Time | Version | Progress | Problem |
|---|---|---|---|
| 2014–2022 | v0.x–v1.4 | Only terraform import, one resource at a time, and it did not generate any configuration | After importing, you still had to hand-write the HCL 4 |
| 2023.06 | v1.5 | Introduced the import block and the -generate-config-out parameter, so it could generate configuration | But you still had to write them one by one, and still had to provide the existing resource IDs yourself |
| 2024.01 | v1.7 | The import block gained support for for_each | Batch import at last, but you still had to obtain the IDs yourself |
| Second half of 2024 | v1.12 | Introduced the terraform query and list blocks, finally enabling automatic resource discovery | But this feature has to be implemented by each Provider, and many Providers simply have not caught up |
The community has been complaining about this for years, yet the question ‘I already have a pile of existing resources — how do I import them into Terraform?’ was never taken seriously. As an Infrastructure as Code tool, Terraform’s design philosophy is declarative configuration and idempotence 5. Hashi Corp. firmly believes that ‘the state declared in code is the only source of truth, so resources should be created from scratch with Terraform’. But in reality, most companies already have a large amount of legacy infrastructure. Having resources first and code later is the norm. Hashi Corp. acknowledged this contradiction very late; the terraform query in v1.12 was really the first time the official tooling took the issue seriously — though as for Provider ecosystem support… well, it has been rough.
Terraform file structure
Terraform’s file structure is very simple. When it runs, the main program blindly reads all .tf files in the working directory. As long as the required information is present, you can name the files whatever you like. For example, my file structure looks like this:
| |
main.tf is used to store the basic configuration:
| |
provider.tf is used to store the configuration for each Provider:
| |
It is left empty here because we can pass credentials through environment variables instead of writing them directly into the configuration file. For example, the Cloudflare Provider accepts CLOUDFLARE_API_TOKEN as an alternative to the api_token variable.
variables.tf is used to declare custom variables:
| |
These variables can be passed in through environment variables prefixed with TF_VAR_. Terraform will also automatically read variables from the terraform.tfvars file. The main purpose of variables is to be referenced from other configuration files, for example:
| |
With these basic settings in place, we can run terraform init to initialise the Terraform environment and lock dependency versions. After that, the rest is just declaring our resources.
Importing existing resources into Terraform
As mentioned earlier, Terraform uses state management. This is great, but it also creates a problem during initialisation: by default, Terraform’s state file is obviously empty.
At this point, what we need to do is import the state of the existing resources from the cloud provider into Terraform, so that Terraform can take over and manage our infrastructure seamlessly. As you have probably noticed from the earlier rant, resource import in Terraform is a sore point. Taking DNS records hosted on Cloudflare as an example, if the Provider supports it, you can use terraform query, introduced in Terraform 1.12. In most cases, though, Providers have not implemented this new feature, and Cloudflare is one of those that does not support it.
Fortunately, even if Hashi Corp. has not taken the problem seriously, companies that use Terraform heavily to manage infrastructure have come up with their own solutions. Cloudflare maintains an import tool called cf-terraforming, which saves a lot of manual effort. First, install cf-terraforming. This tool is written in Go, so you either need a Go environment to install it, or you can place the official precompiled binary into $PATH and make it executable.
| |
The tool is fairly straightforward to use. First, you need the following environment variables:
| |
TipThe commands here assume you are using Bash. If your shell is not compatible with Bash syntax, you will need to adjust them. For example, in PowerShell on Windows, the syntax for setting an environment variable is:
1$env:CLOUDFLARE_API_TOKEN='Hzsq3Vub-7Y-hSTlAaLH3Jq_YfTUOCcgf22_Fs-j'
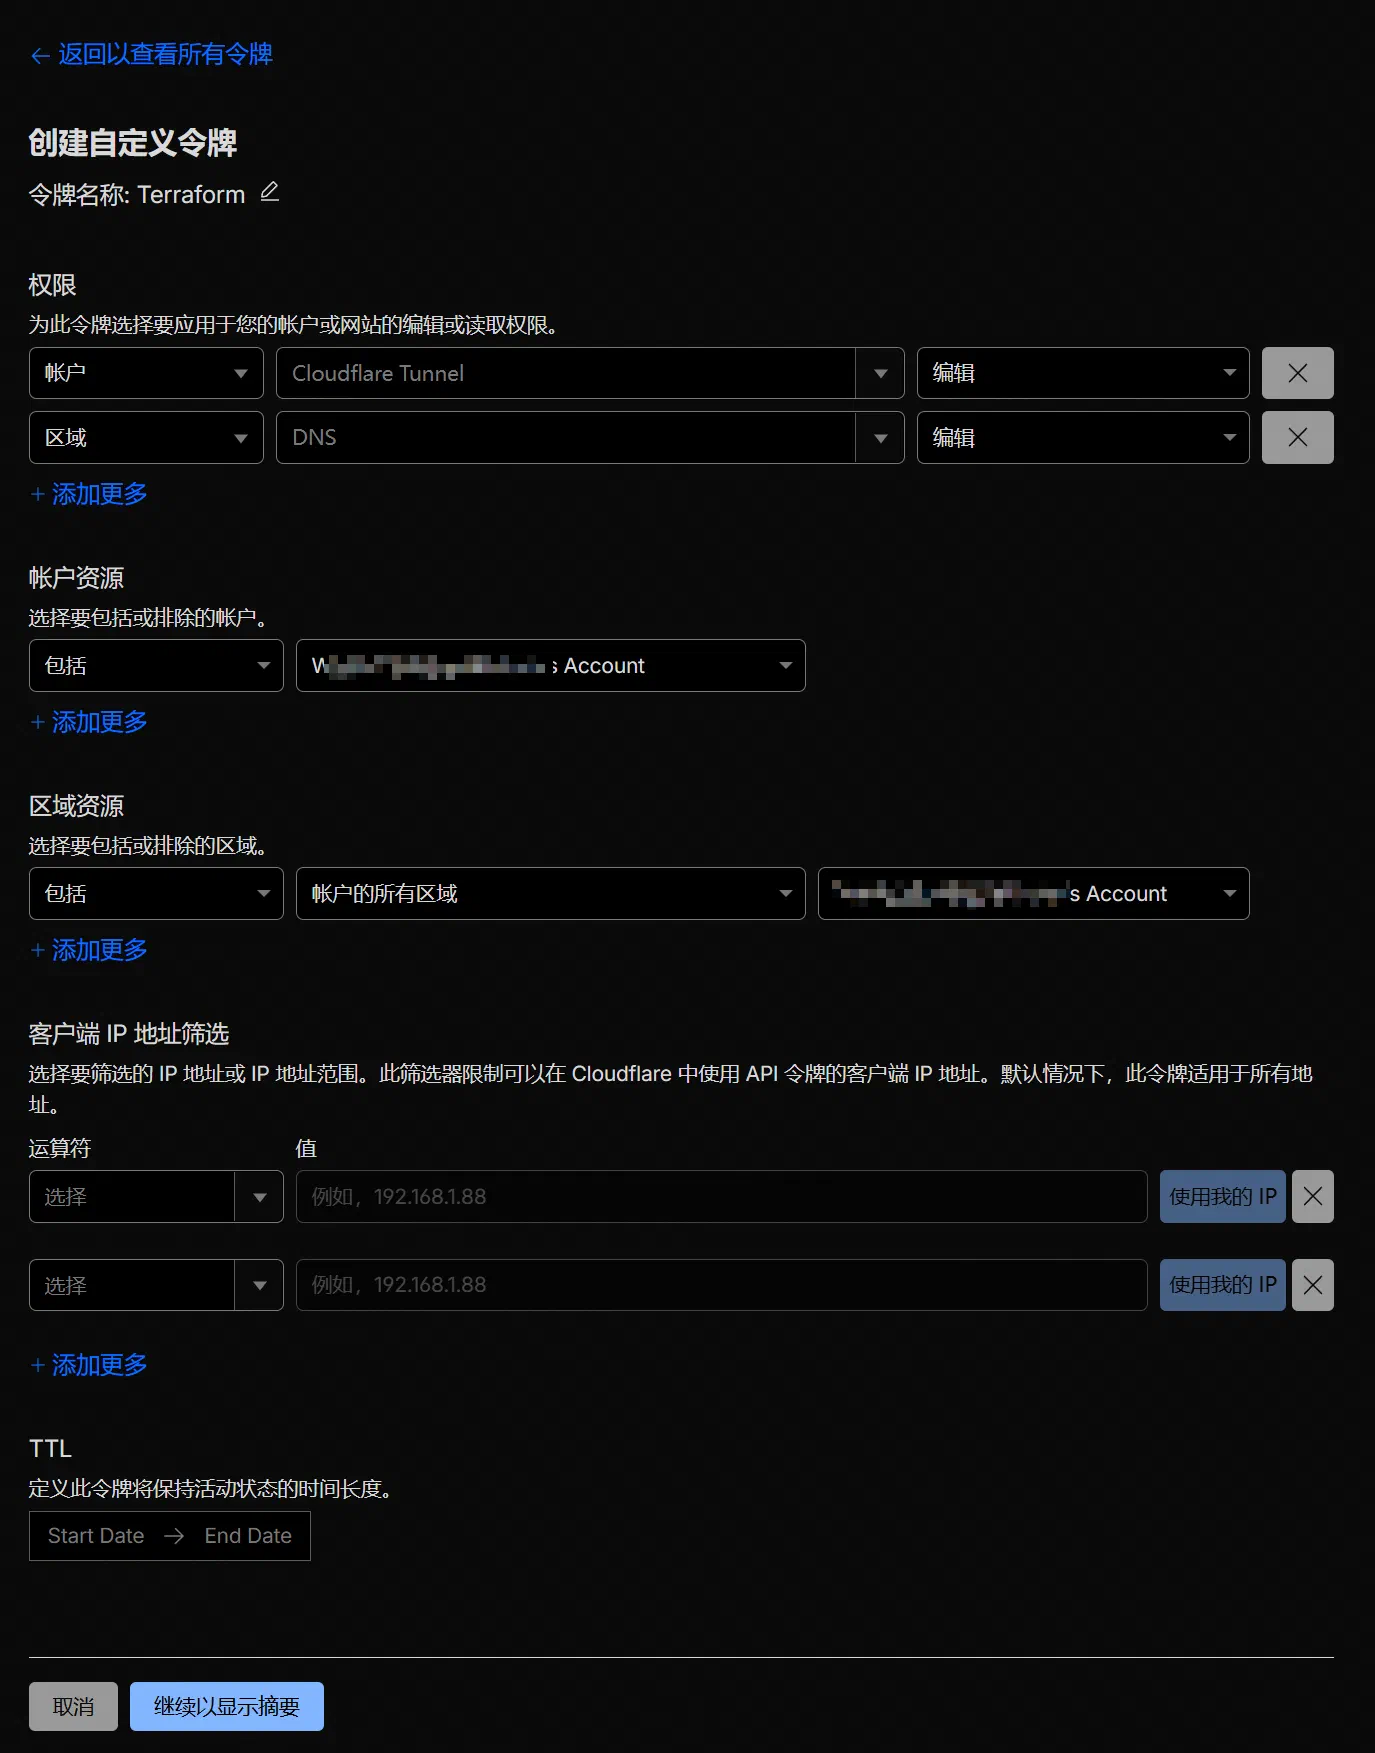
Usually, you only need to set CLOUDFLARE_API_TOKEN and CLOUDFLARE_ZONE_ID. When creating the API token in the console, remember to grant it the necessary permissions. In this case, we are only importing DNS records, so giving it permission to edit zone DNS is enough.
Right, all the preparation is done. Now we can start generating the configuration files.
First, import the domain configuration in the account, namely cloudflare_zone:
| |
This step generates a file called zone.tf in the current directory, containing content in the following format:
| |
At this point, the domain resources have been imported, but their internal configuration has not. Next, import the DNS records under the domain:
| |
This step generates a configuration file called dns.tf in the current directory, containing content in the following format:
| |
If you need to import multiple domains, just set the CLOUDFLARE_ZONE_ID environment variable separately each time and rerun the command.
The generated configuration file here can be used directly — it is the Terraform configuration file we need later. However, at this point we have only generated the configuration file; Terraform’s state is still empty. If you run terraform apply now, Terraform will blindly treat all the declarations we just imported as new resources and throw a pile of ‘Alredy Exists’ errors. So next, we need to import the generated configuration into Terraform’s terraform.tfstate state.
Terraform introduced the import block in version 1.5, which is much more modern than typing import commands one line at a time. The process is to generate an .tf file containing import blocks. The next time you run terraform apply, Terraform will automatically perform the import for you.
Generate the import blocks for cloudflare_zone:
| |
Generate the import blocks for cloudflare_dns_record:
| |
This step generates import.tf in the current directory. It contains the import information needed to tell Terraform which cloud-provider resource ID corresponds to each resource block generated in the previous step. This ID is the code the cloud provider uses internally to identify a resource. You would not normally see it in the control panel; you only get it by requesting it through the API. Terraform needs this ID during import to confirm that the local definition matches the cloud resource, ensuring strict idempotence.
Right, now let us run terraform plan:
| |
If the numbers for Add, Change, and Destroy are all 0, then the import has gone correctly. Just run terraform apply --auto-approve, and the resources will be imported.
| |
State storage and continuous integration
One of IaC’s core strengths is that it makes Git-based collaboration and CI easy, but before that there is another problem to solve: where exactly should terraform.tfstate live? Nobody wants to painstakingly import state for each environment only to lose it every time they switch.
Terraform currently supports the following state backends:
- local
- remote
- azurerm
- consul
- cos
- gcs
- http
- Kubernetes
- oci
- oss
- pg
- s3
If you do not have any special requirements, you can choose s3 as I do. Cloudflare R2 has a free tier, after all, so you might as well use it.
| |
For the S3 backend, it is recommended to store credentials in the two environment variables AWS_ACCESS_KEY_ID and AWS_SECRET_ACCESS_KEY:
| |
Once configured, run terraform init -migrate-state and the state will be stored successfully in the cloud. After that, no matter where you edit the configuration or run terraform apply, you will not need to worry about Terraform state getting out of sync.
Next comes the GitHub CI configuration. It is actually very simple: on each git push, just trigger terraform init, terraform fmt, and terraform apply. Here is my .github/workflows/apply.yml:
| |
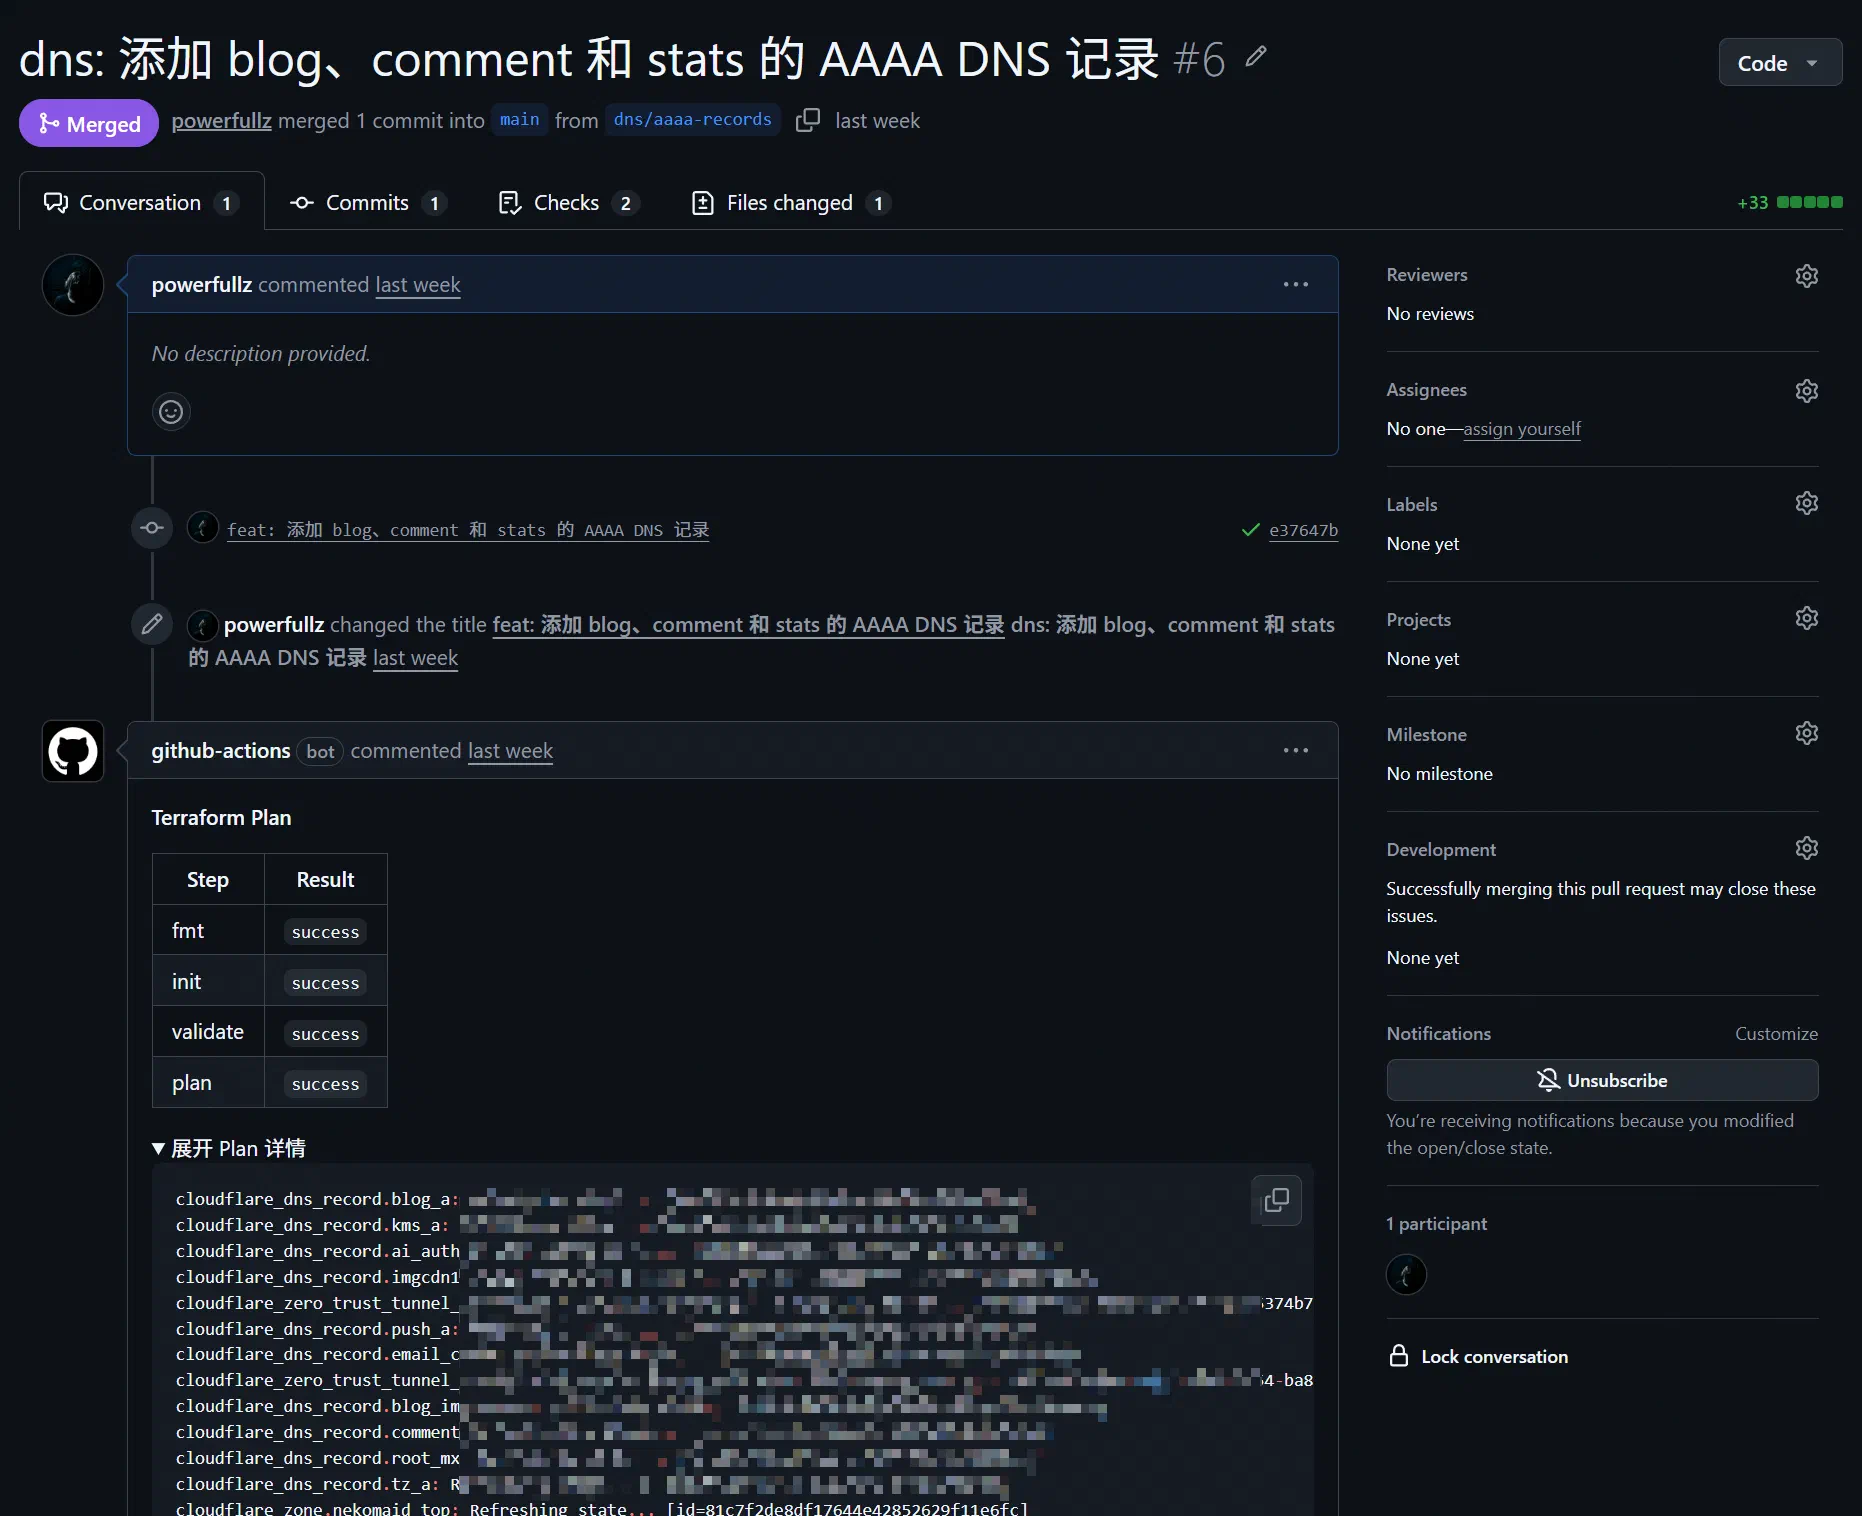
For PRs, CI should automatically attach the output of terraform plan to each PR:
| |
Ongoing workflow
At this point, Terraform’s initial ‘takeover’ is complete, and after that you move into day-to-day maintenance. At this stage there are really only three things to do:
- Create new resources
- Modify existing resources
- Delete resources that are no longer needed
There are only two common operations: terraform plan and terraform apply. If you are working alone, you can usually just commit small changes directly. If you are working in a team, though, each change should follow the principle of using a PR whenever possible rather than committing directly.
Creating infrastructure
Suppose you want to add a new DNS record, create a new Tunnel, or create a new object storage bucket. The process looks like this:
The ideal plan output is:
X to add0 to change0 to destroy
If you only meant to add something but to destroy appears, do not rush in. Usually it means a bad reference, a wrong variable, or that you accidentally changed a resource address. Check carefully to see what went wrong.
Modifying and deleting infrastructure
The process for modifying resources is similar to creating them, but there is one extra step: evaluate whether the change will trigger a rebuild.
That is because many Provider fields are ForceNew. You think you are only changing one field, and Terraform replies: ‘Right then, delete and recreate it.’ In a DNS scenario like this, that is not a huge issue, but for something like a cloud instance, deleting and recreating it can obviously cause real damage.
It is best to follow this order:
For production environments, being a bit slower when creating or modifying things is not a big problem. What matters most is correctness. Go a bit slower; do not make mistakes. IaC is not a speed contest — it is about predictability.
If you are deleting resources instead (for example, retiring a DNS record or cleaning up an abandoned Tunnel), follow the process below 6:
Suggestions for day-to-day collaboration
- Put credentials in environment variables or CI secrets; do not write them into
.tfor the repository - Enable protection policies for critical resources to prevent accidental deletion
- Split directories by resource type
- Run
terraform planregularly to check for and correct infrastructure drift 7, so you do not end up with manual dashboard changes by mistake
Although this workflow may look a bit cumbersome, every change is recorded, auditable, and reversible — and most importantly, reproducible. That is where IaC delivers its real value.
References
- Using Terraform to manage DNS records on CloudFlare - Candinya
- Automate Terraform with GitHub Actions
- Query configuration files
- list block reference
- cloudflare/cf-terraforming
- Import Cloudflare resources
- Cloudflare Provider - Terraform Registry
Infrastructure as Code refers to a method of defining and deploying the required infrastructure using machine-readable configuration files. ↩︎
Each provider uses different field names and formats in its configuration files, but these can be converted fairly easily with a script. ↩︎
One especially important thing to note is that the state file may contain sensitive information stored in plain text, such as database passwords and API keys, so you must never commit the
.tfstatefile to a public code repository. ↩︎HashiCorp Configuration Language, a declarative configuration language developed by HashiCorp, designed to balance machine readability with human readability. ↩︎
Idempotence means that when a computer system or interface receives the same request multiple times, the effect is the same as if it had been executed once. No matter how many times it runs, the system’s final state remains consistent. ↩︎
If you only want Terraform to stop managing a resource, rather than actually destroying it in the cloud, you should use the
terraform state rmcommand instead of deleting the resource block from the code and then runningapply, otherwise the real resource in the cloud will be destroyed as well. ↩︎Infrastructure drift refers to a situation where infrastructure is modified in reality through non-IaC means such as clicking around in a console, causing the actual state to differ from the state declared in code. ↩︎
Comments are disabled until you accept functional cookies.